Creating an Animated TextField with React Native
Create a simple react-native TextInput with material animation.
Last Update: January 12, 2020
9 min read • ––– views
Five years ago, I created react-native-textinput-effects library. And the Animated library behind that has not changed much since then. So I'm going to use the same principles, and build a new React Native TextInput component from scratch.
I'll implement the material-ui animation this time. It's a simple one so I think it's a useful example to understand the basics of animation in React Native.
You may find the full version of this component on Github. I also managed to port the React Native code into the web thanks to react-native-web.
Play with it here 👇
As you may see in the preview, the TextField has four main UI states that we are going to implement:
Starting with a basic TextField
Let's start with a basic TextField that extends react-native TextInput and styles it.
import React from 'react';import { StyleSheet, TextInput } from 'react-native';// extend from native TextInput propstype Props = React.ComponentProps<typeof TextInput>;const TextField: React.FC<Props> = (props) => {/*** spread operator helps to extract style prop and assign** any remaining props to the `restOfProps` variable.** it is pretty handy here as we need to support** all the props the native TextInput component has.*/const { style, ...restOfProps } = props;return <TextInput style={[style, styles.input]} {...restOfProps} />;};const styles = StyleSheet.create({input: {padding: 24,borderColor: '#B9C4CA',borderWidth: 1,borderRadius: 4,fontFamily: 'Avenir-Medium',fontSize: 16}});export default TextField;
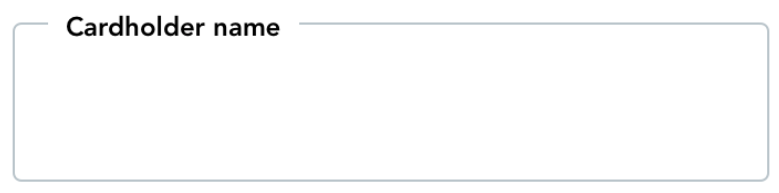
The output is a simple TextInput with a border and placeholder text.
<TextField placeholder="Cardholder name" />

Creating the label
placeholder prop plays the label role only when the input is empty. This isn't enough for our case so we need to create our custom label that'll be displayed on top of the input.
Wrapping the TextInput with a parent View and creating another View as a sibling for the label would give us lots of room to customize our label. We'll use position: absolute style for the label to make sure it's located on top of the TextInput.
Note that I've extended the native TextInput component props with a new prop called label which will be unique to the TextField.
type Props = React.ComponentProps<typeof TextInput>type Props = React.ComponentProps<typeof TextInput> & {label: string}const TextField: React.FC<Props> = (props) => {const { style, ...restOfProps } = propsconst { label, style, ...restOfProps } = propsreturn (<TextInputstyle={[style, styles.input]}{...restOfProps}/><View style={style}><TextInput style={styles.input} {...restOfProps} /><View style={styles.labelContainer}><Text style={styles.label}>{label}</Text></View></View>)}const styles = StyleSheet.create({labelContainer: {position: 'absolute',left: 16,top: -6,paddingHorizontal: 8,backgroundColor: 'white',},label: {fontFamily: 'Avenir-Heavy',fontSize: 12,},
The TextField looks like this now:
Positioning the label based on focused state
The label needs to move between the center and top of the input depending on the focused state. Let's start with simply positioning the label based on an internal isFocused state without any animation.
We may listen TextInputs onBlur and onFocus methods and modify our isFocused state based on them. And manipulating the top style of our label based on isFocused state will be enough to re-position the label. We'll also modify the label font size and color.
const TextField: React.FC<Props> = (props) => {const {label,style,onBlur,onFocus,...restOfProps} = propsconst [isFocused, setIsFocused] = useState(false)return (<View style={style}><TextInput style={styles.input} {...restOfProps} /><View style={styles.labelContainer}><Text style={styles.label}>{label}</Text><TextInputstyle={styles.input}{...restOfProps}onBlur={(event) => {setIsFocused(false)onBlur?.(event)}}onFocus={(event) => {setIsFocused(true)onFocus?.(event)}}/><Viewstyle={[styles.labelContainer,{top: isFocused ? -6 : 24,},]}><Textstyle={[styles.label,{fontSize: isFocused ? 12 : 16,color: isFocused ? '#080F9C' : '#B9C4CA',},]}>{label}</Text></View></View>
Animating the label
We now have a label that positions itself based on the focused state. React Native has a built-in Animated component that lets you build animations and that's good enough to support our simple animation. We will create an Animated.Value to represent the focused state and interpolate that to label positioning styles.
Animated.Value accepts a number parameter so we need to express our isFocused state with a number. I'm going to use 0 for the unfocused and 1 for the focused state.
const [isFocused, setIsFocused] = useState(false)const focusAnim = useRef(new Animated.Value(0)).current/*** This effect will trigger the animation every** time `isFocused` value changes.*/useEffect(() => {Animated.timing(focusAnim, {toValue: isFocused ? 1 : 0,// I took duration and easing values// from material.io demo pageduration: 150,easing: Easing.bezier(0.4, 0, 0.2, 1),// we'll come back to this lateruseNativeDriver: false,}).start()}, [focusAnim, isFocused])return (<View style={style}><View<Animated.Viewstyle={[styles.labelContainer,{top: isFocused ? -6 : 24,top: focusAnim.interpolate({inputRange: [0, 1],outputRange: [24, -6],}),},]}><Text<Animated.Textstyle={[styles.label,{fontSize: isFocused ? 12 : 16,fontSize: focusAnim.interpolate({inputRange: [0, 1],outputRange: [16, 12],}),color: isFocused ? '#080F9C' : '#B9C4CA',},]}>{label}</Text></View></Animated.Text></Animated.View></View>)}
Using the native driver
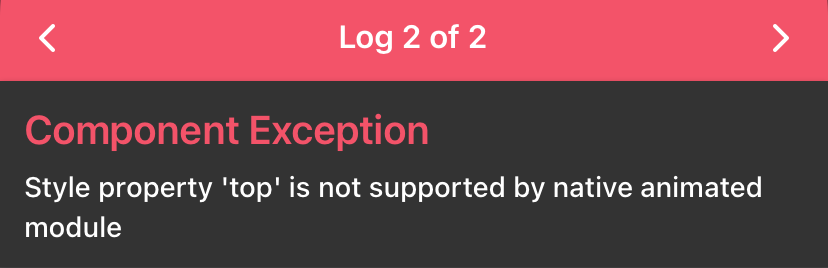
Our animation works perfectly right now. But there is one more thing we can do to make it more smooth on lower-end devices by passing useNativeDriver parameter to the Animated API.
Here is the description from React Native documentation:
By using the native driver, we send everything about the animation to native before starting the animation, allowing native code to perform the animation on the UI thread without having to go through the bridge on every frame. Once the animation has started, the JS thread can be blocked without affecting the animation.
The problem is: the native driver can work with a limited set of properties such as transform and opacity. So it doesn't work with top and fontSize properties and we need to replace them with supported properties. Animated throws an exception when you set useNativeDriver: true:
Fortunately, transform can create the same animation behavior here. We'll use its scale property to replace the fontSize animation, and translateY to move the label. Unfortunately, using scale transform causes the label to move on the x-axis. The only solution I could find to fix it was creating an extra translateX transform and undo the x-axis movement by manipulating it manually.
style={[styles.labelContainer,{top: focusAnim.interpolate({inputRange: [0, 1],outputRange: [24, -6],}),transform: [{scale: focusAnim.interpolate({inputRange: [0, 1],outputRange: [1, 0.75],}),},{translateY: focusAnim.interpolate({inputRange: [0, 1],outputRange: [24, -12],}),},{translateX: focusAnim.interpolate({inputRange: [0, 1],outputRange: [16, 0],}),},],},]}><Animated.Text<Textstyle={[styles.label,{fontSize: focusAnim.interpolate({inputRange: [0, 1],outputRange: [16, 12],}),color: isFocused ? '#080F9C' : '#B9C4CA',},]}>{label}</Animated.Text></Text></Animated.View></View>)
You can now start using the native driver by passing useNativeDriver: true to Animated.
Creating the errored state
This is the final TextField state we need to support. We'll simply define a new prop called errorText and modify the label and border-color when that prop is not empty.
type Props = React.ComponentProps<typeof TextInput> & {label: stringerrorText?: string | null}const TextField: React.FC<Props> = (props) => {const {label,errorText,style,onBlur,onFocus,...restOfProps} = propslet color = isFocused ? '#080F9C' : '#B9C4CA'if (errorText) {color = '#B00020'}return (<View style={style}><TextInputstyle={styles.input}style={[styles.input,{borderColor: color,},]}{...restOfProps}onBlur={(event) => {setIsFocused(false)@@ -72,13 +83,15 @@ const TextField: React.FC<Props> = (props) => {style={[styles.label,{color: isFocused ? '#080F9C' : '#B9C4CA',color,},]}>{label}{errorText ? '*' : ''}</Text></Animated.View>{!!errorText && <Text style={styles.error}>{errorText}</Text>}</View>)}const styles = StyleSheet.create({error: {marginTop: 4,marginLeft: 12,fontSize: 12,color: '#B00020',fontFamily: 'Avenir-Medium',},})
Final touches
TextField looks great now but there are a few minor problems we should fix.
The first problem is: The text we enter disappears when isFocused: false. So we need to make sure we're always positioning the label at the top when the input value is not empty:
const {label,errorText,value,style,onBlur,onFocus,...restOfProps} = propsconst [isFocused, setIsFocused] = useState(false)const focusAnim = useRef(new Animated.Value(0)).currentuseEffect(() => {Animated.timing(focusAnim, {toValue: isFocused ? 1 : 0,toValue: isFocused || !!value ? 1 : 0,duration: 150,easing: Easing.bezier(0.4, 0, 0.2, 1),useNativeDriver: true,}).start()}, [focusAnim, isFocused])// make sure you are passing `value` to the dependency array// so the effect will be run anytime the value changes.}, [focusAnim, isFocused, value]
The second problem is happening when you click on the label on empty input. React Native doesn't trigger the keyboard here as the clicked element is just a Text rather than a TextInput. So we need to turn the label into a button and trigger the input focus event manually:
// create an input refconst inputRef = useRef<TextInput>(null)// pass `inputRef` to the TextInput<TextInput ref={inputRef} />// wrap label View with `TouchableWithoutFeedback`<TouchableWithoutFeedback onPress={() => inputRef.current?.focus()}>
Output
Here is a video preview of the TextField:
And again, you can find the full version on Github.